
One Thing Leads to Another

Pin It

One thing we never thought of, when renovating our backyard, was replacing the limestone retainer wall that runs at the back of the patio. But little did we know that it would start imploding last summer! Honestly we probably did not help the situation by having several junipers removed that were quite old and planted in the top part of the wall. This was probably part of the reason as the root system was likely holding things together. Yeah, we saw signs of that happening but still...

I guess, looking back at old photos, it was in a lot
worse shape than we realized. But in it's own way
it had its charm with all the aged layered limestone.
All the hostas in this photo (and much more on other side)
was thrown in a pile that sat in the hot summer weather
for 6 weeks. After the new wall was finished, I replanted
 them and they all lived.


After removing the limestone.


limestone


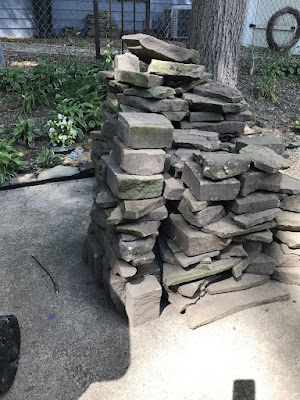
Boy, did we have limestone!
Every bit of it was used in other parts of the yard. 


This is along the length of the north half.


Lining up the new retainer wall block after
a load of gravel was put down as a base.
That black 'pole' is actually the gas line to an original
gas grill. It didn't work and we had the gas line disconnected
but no way to tear it out.


Progress!


After many weeks of part time work, it was finally finished. Well the wall was finished anyone. Next was my turn in replanting all the hostas and new plants and landscaping the top. I love how it turned out and so happy that our old wall imploded after all!

This is a view along the top of the wall as it runs to the
north side of the patio. Replanted the hosta from previous
wall that was torn out, bought some new hostas and perennials.
Used limestone to edge the planted area.


This view is the patio side of he wall and how it
seamlessly rolls into the pond area as well
as the patio area.


Comments

Popular posts from this blog

When your plan really isn't your plan after all.

I don't know about you but before I start a project, I start the vision for the project. Sometimes way before the project starts! But often, that vision changes multiple times before the project is finished. Heck sometimes I don't really even have a plan I just start painting or tearing out stuff and sometimes I just change my mind. But most times, it is because what I really want to do, for one reason or another, I can't. Take our basement bathroom for example. In this case I had a basic plan and everything that could go wrong, went wrong. As I was thinking about the bathroom I realized I hated it in the furnace room to begin with. I also hated the sauna and shower the previous owners had installed at the other end of the basement (which we never use). So I put plans in motion to get rid of the sauna. This would free up a big chunk of space and my plan was to make it a full bath at that end of the basement as it already had a shower. Several months later, and multiple fail...

DIY Kitchen Counter Beadboard Treatment

We have lived in our house for six years this month and every month of every year I have hated the back of this bar area! It is sooo blah and sooo oak  and sooo country looking. So, started researching what I wanted to do with it. First I tried to add the decorative wood corner pieces along with a decorative wood scrolly thing (real technical name, huh?) for the center. Did a cool paint treatment and really loved it, just threw some wood glue on and glued them up there. They lasted about six months. Every month or so another decorative piece would fall off until all I had left was one corner piece and the middle thing. I then tried a paper bag wallpaper treatment that really worked well and, of course, was real cheap. After applying the paper bag wallpaper I mixed some brown paint with water and antiqued it. Then, let that dry and antiqued it with a black glaze. Looked absolutely fantastic but as it started to dry the paper bags started lifting off the wall. So, I finally r...

A Quicker and Easier Way to Stepping Stones

Pin It This post came up in my memories feed from 2013 and as I was cleaning my yard up for Spring, I realized just how great these stepping stones still look six years later! So, yes I can still say: " However, my best project yet? Stepping stones. Now you might be wondering why this is such a big deal? I have wanted to put a stepping stone pathway from the gate to the backyard and back towards the patio/pool area for eight years. Eight looooong years. You wouldn't think this would be such hard thing to do now would you? But it was either the money (means about 15-20 stones which can get quite pricey), needing a truck or trailer to haul them, needing help to lift the suckers, or just life that got in the way."  Recently I read some articles about quick and easy stepping stones and it got me thinking that I could make that project quicker and easier by cutting a few corners. You won't believe how easy this was! 1. Buy a bag of Quikrete or regular ...