Sunday, January 31, 2010

DIY Kitchen Counter Beadboard Treatment

We have lived in our house for six years this month and every month of every year I have hated the back of this bar area! It is sooo blah and sooo oak  and sooo country looking.

So, started researching what I wanted to do with it. First I tried to add the decorative wood corner pieces along with a decorative wood scrolly thing (real technical name, huh?) for the center. Did a cool paint treatment and really loved it, just threw some wood glue on and glued them up there. They lasted about six months. Every month or so another decorative piece would fall off until all I had left was one corner piece and the middle thing.
I then tried a paper bag wallpaper treatment that really worked well and, of course, was real cheap. After applying the paper bag wallpaper I mixed some brown paint with water and antiqued it. Then, let that dry and antiqued it with a black glaze. Looked absolutely fantastic but as it started to dry the paper bags started lifting off the wall. So, I finally ripped it all off and lived with a nasty looking counter. (This was all before I entered blogdom and have no pictures of it).

Then after we had finished the beardboard in the bathroom I was looking at the pile of leftovers and realized that I had enough to finish off the back of the counter. This got me searching on the internet to look for ideas and inspiration because although I liked the beadboard idea, couldn't figure out how to finish it and marry it with the oak cabinets. Which, quite honestly, I would like to paint but hubby is not sold on the idea!

My husband did cut the wainscoating for me. I decided to paint it black from inspiration I got from Thrifty Decor Chick. She did a great job of blending a black beadboard counter bar with her maple cabinets. After a simple (only about 16 coats of black paint....easy!) paint job, I applied liquid nails and some panel nails and slapped it up. That was super easy! Finished off the outside corner with the existing trim piece painted black. Purchased the cheap baseboard and quarter round, again painting it black. Mitered it and installed it. I think it turned it pretty nice. Actually, I love it!


Now, to find a cheap solution for my 'blah' counter top!

This week, I'm hooking up to:


Tuesday, January 26, 2010

Wall Renovation

Starting with a blank slate is always a good thing, right? I have been staring at this blank wall for more than a year not sure just what I wanted to do with it.  I have started a couple of different projects for this space but never finished them cause nothing seemed quite right. I spent $20 on trim that I didn't use, I started painting some old frames that are now in my basement half painted. Still didn't seem to work.

In the meantime I was collecting white plates that I found on clearance or at Salvation Army not sure what I was going to do with them either. But I took pictures along the way because I was sure that I was going to wow everyone with my great DIY projects! Well I don't know about the rest of you but oftentimes my projects start out one way and by the time I'm through end up 180 degrees from where they started. Such is the case with this. I love how it turned out though. It is simple, nothing worthy of great accolades but it fits the room well and reflects more light into a dark space. The best part was the price. I didn't pay for than $3 for any one plate. Couple I paid $1. for. And, the mirror was on sale for $25.!


Joining up with Thrifty Thursday at Tales from Bloggeritaville

$2.50 garage sale lamps and a little paint


I found these lamps for $2.50 each at a garage sale and just had to get them. Didn't know what to do with them or even where I would use them but I loved the 'bones.'

Well, I let them sit in my basement for a few weeks just thinking about them, trying to figure out what I would do with them. Then, saw a cool project on "resolved-2-worship" xanga site and decided to try it on these lamps. Took off the shades and donated to Goodwill! Got out the spray paint and "wala" (is that a word?).

See the 'after' and let me know what you think.

They look like brand new but I don't think the picture does them justice.


Wednesday, January 6, 2010

Power of Paint....Party at Domestically Speaking

When I found out about Domestically Speaking's Power of Paint party I had to enter. I am a paint FANATIC. Did I say I LOVE to paint? We will just hit six years this February living in our current house and I have repainted the kitchen three times, the living room twice. Let's see dining room twice, family room turned office three times, 1/2 bath 2x....okay I guess I can stop. That doesn't include the spray painting of picture frames, furniture, whatever can hold paint, I will try it.


This post, in particular, is about painting my built-ins that are part of my fireplace surround. Yes, as you will see in the pictures it is 70s brick. Now I know the trend is either to paint this or to cover with updated tile that is more contemporary. Trust me, I have thought of it all. But, I have to admit when it comes to permanent changes (like painting brick) I REALLY hesitate to alter something that can't be changed back to the original (well, in this case, not very easily anyway). Because if you live long enough you will find that "there is nothing new under the sun" and what is not popular now probably will be popular again in 10 years or less.

But, as you can see the whole fireplace area is D.A.R.K. as is the whole room. I whitewashed the dark brown mantel which helped a little but was still wanting something to brighten up the area and make it 'pop'.
So, I grabbed the paintbrush and went at it. Took several coats to cover the dark bown wood shelfs and trim. I then used the red color from my kitchen as the background for these shelves. I still wanted something more. I searched and brainstormed wallpaper, brass washers glued in a diamond design to the back (from Myles of Styles) but finally settled with adding the stencil using a gold metallic glaze. I have to say, although the pictures may not do it justice, it really came to life and I absolutely L.O.V.E. it!


A simple paint transformation.


Monday, January 4, 2010

Show Me Your Bathroom

A look at the original, to read more 1970s bathroom.

One of our biggest and most time consuming remodels was our upstairs bathroom. But if you could have seen it before! Okay, you asked so I'll show you.


See? Not pretty for sure. Oh yeah, I did a few temporary updates like painting the turquoise wall tiles and painting the cabinets. Only good this did was to eliminate some of the turquoise that was originally in this room. Can we say obsessive? I was never happier than to start ripping that old tile out!


bathroom remodel
New bathroom vanity, quartz countertops and sinks installed.


Wainscoatting, new paint color and toilet of course!


Mirrors were hung to cover old recessed medicine cabinets
that left a big, square, hold in the wall after removal!


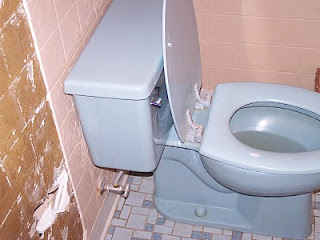
What can you say about a new toilet other than it is
not turquoise!


Huge transformation that was finished almost three years ago. Time for a little refresh in the near future! Soon as it gets cool enough to even think about painting on the second floor!


Friday, January 1, 2010

What were we thinking? Bathroom Remodel #1

For five years we have lived in this house and I have HATED the master bathroom. Original to the 70s when it was built, the turquoise floor, wall tile, toilet, sinks, and vanity counter were pretty h a r d on the eyes! However, even for me who is c.o.n.s.t.a.n.t.l.y. thinking about what to remodel I was way too overwhelmed to think about tackling this project. Look at the picture and you can see why. But, alas, we were backed into the proverbial corner as, piece by piece, the floor tile starting coming up, the vanity doors started falling off, the drains broke. Oh the horror!

Finally my husband said that it was time to start thinking about remodeling the bathroom. So, the journey began of brainstorming ideas, searching the internet, looking at vanities, etc. A very time consuming journey that started one way and, by the time it was done, did a total about face.


Nice looking wall don't you think?


So the destruction began with ripping down the turquoise wall tile that functioned like wainscoating. Ahh, I LOVE demo!


Even now as I'm looking at these pictures I am breathing a nice, contented sigh of relief that all of this old stuff is G O N E!


We carted it all out to the front porch and would you believe...


That the Habitat Restore came and took all this junk? I gotta say that I thought even they would not have a use for it, but I 'm glad they did. I much prefer to reuse than throw in the junk.

Stay tuned for Bathroom Remodel #2...the adventure continues.

The Wallpaper from Hell

Pin It My first project of 2024 finds me updating my hallway with board and batten wainscoting and peel and stick wallpaper treatment at th...