
Should I Paint?

We have lived in this house since 2004 and 12 years I have been mulling over my brick fireplace. 

You see my house is a 70s built traditional 2-level house with the 'family' room in the back that has a brick fireplace that fills the. whole. wall. Seriously.

This is the fireplace in our back room. 
When we moved in the mantel was dark wood and the bookcases had dark brown paneling lining the back and the shelves and frame was all dark wood. Because the room has one patio door for natural light, this made for a VERY dark room. Additionally the wainscotting was also the same dark brown paneling. So in my efforts to lighten the fireplace and room I white washed the mantel and added the decorative element, painted the shelves white and actually added a gold metallic glaze over the top of the brick to make it shine and reflect light.

White washed mantel and painted shelves brighten the space.

I have been on the brink of an update but have hesitated every time. Why you might ask? Because once you paint brick there is no turning back (well unless you sand blast it!). So I wanted to be very sure that it was the right thing to do.

After seeing a Fixer Upper episode the last week of February of The Severn's I loved the shiplap and painted brick combo fireplace redo. Which has started me thinking it all over again and I realize it is time to take the plunge.


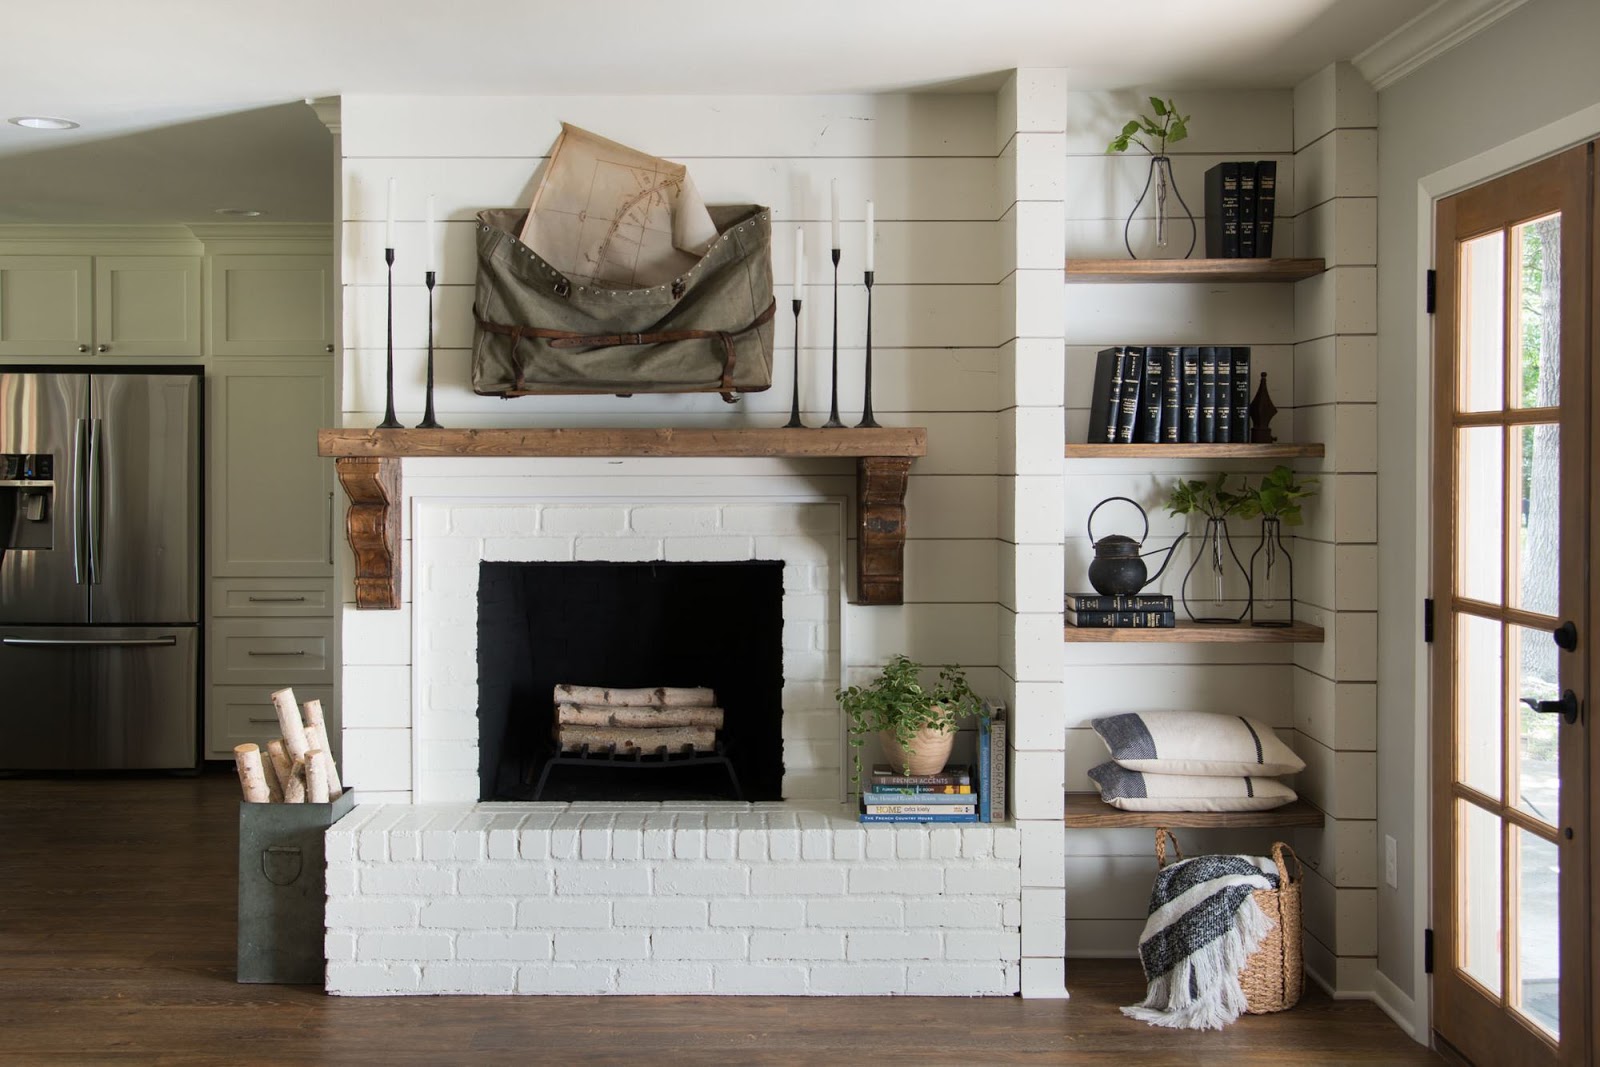
The Severn's home remodel and updated fireplace from Fixer Upper.


While this is my inspiration, the end result will be my own version of this. Besides, it is the first step in a whole room update which is long over due!

Stay tuned for the final results!

I would love to hear your thoughts. Have you ever painted and updated an old brick fireplace? Were you satisfied with the end result? Would you do it again?

Linking up to:


Comments

  1. I wouldn't paint it, but maybe applying shiplap above the mantle would break-up all the brick and be pleasing to the eye.

    ReplyDelete

Post a Comment

Thanks for visiting my nest. I love to hear from my visitors! Leave your comments here:

Popular posts from this blog

When your plan really isn't your plan after all.

I don't know about you but before I start a project, I start the vision for the project. Sometimes way before the project starts! But often, that vision changes multiple times before the project is finished. Heck sometimes I don't really even have a plan I just start painting or tearing out stuff and sometimes I just change my mind. But most times, it is because what I really want to do, for one reason or another, I can't. Take our basement bathroom for example. In this case I had a basic plan and everything that could go wrong, went wrong. As I was thinking about the bathroom I realized I hated it in the furnace room to begin with. I also hated the sauna and shower the previous owners had installed at the other end of the basement (which we never use). So I put plans in motion to get rid of the sauna. This would free up a big chunk of space and my plan was to make it a full bath at that end of the basement as it already had a shower. Several months later, and multiple fail...

DIY Kitchen Counter Beadboard Treatment

We have lived in our house for six years this month and every month of every year I have hated the back of this bar area! It is sooo blah and sooo oak  and sooo country looking. So, started researching what I wanted to do with it. First I tried to add the decorative wood corner pieces along with a decorative wood scrolly thing (real technical name, huh?) for the center. Did a cool paint treatment and really loved it, just threw some wood glue on and glued them up there. They lasted about six months. Every month or so another decorative piece would fall off until all I had left was one corner piece and the middle thing. I then tried a paper bag wallpaper treatment that really worked well and, of course, was real cheap. After applying the paper bag wallpaper I mixed some brown paint with water and antiqued it. Then, let that dry and antiqued it with a black glaze. Looked absolutely fantastic but as it started to dry the paper bags started lifting off the wall. So, I finally r...

A Quicker and Easier Way to Stepping Stones

Pin It This post came up in my memories feed from 2013 and as I was cleaning my yard up for Spring, I realized just how great these stepping stones still look six years later! So, yes I can still say: " However, my best project yet? Stepping stones. Now you might be wondering why this is such a big deal? I have wanted to put a stepping stone pathway from the gate to the backyard and back towards the patio/pool area for eight years. Eight looooong years. You wouldn't think this would be such hard thing to do now would you? But it was either the money (means about 15-20 stones which can get quite pricey), needing a truck or trailer to haul them, needing help to lift the suckers, or just life that got in the way."  Recently I read some articles about quick and easy stepping stones and it got me thinking that I could make that project quicker and easier by cutting a few corners. You won't believe how easy this was! 1. Buy a bag of Quikrete or regular ...