Tuesday, July 30, 2013

Garden Globes and Gazing Balls and a Hometalk Curator Event

Pin It

I was recently contacted by Hometalk and asked to curate a Garden Globes and Gazing Balls event. All because of my bowling ball turned Mosaic Garden Globe project!


Mosaic Bowling Ball

Of course I wouldn't dream of saying no, would you? I was thrilled and honored to be asked. After all I love Hometalk. If you haven't checked out Hometalk you really should. today.

Little did they know that I was in the process of completing another garden globe makeover project that I was getting ready to post!


So I started browsing Hometalk to look for some fabulous garden globe projects and was able to find some very interesting projects to show you. Although overall, there weren't as many as I expected, I think you will find some very unique ideas that you can try at home!

So I hope you enjoy this new board on Hometalk called Garden Globes and Gazing Balls!


Linking up this week to:

Tuesday, July 23, 2013

Yup, someday

Pin It

Do you ever have all these things stored away for those 'some day' projects? Yup, me too. They collect on my long list of things I want to do but never seem to have the time to do them list. You know the one I'm sure.

Now that the summer is half gone and we have settled into somewhat of a summer routine, I have been tackling some of those 'some day' projects.


Once upon a time she was a beautiful ornamental globe that graced my garden.
Her days of splendor gone, it was time for a new look.
 
It is such a feeling of accomplishment, especially when all those 'some day' projects that are in your head actually end up working and bringing together something new and cool!


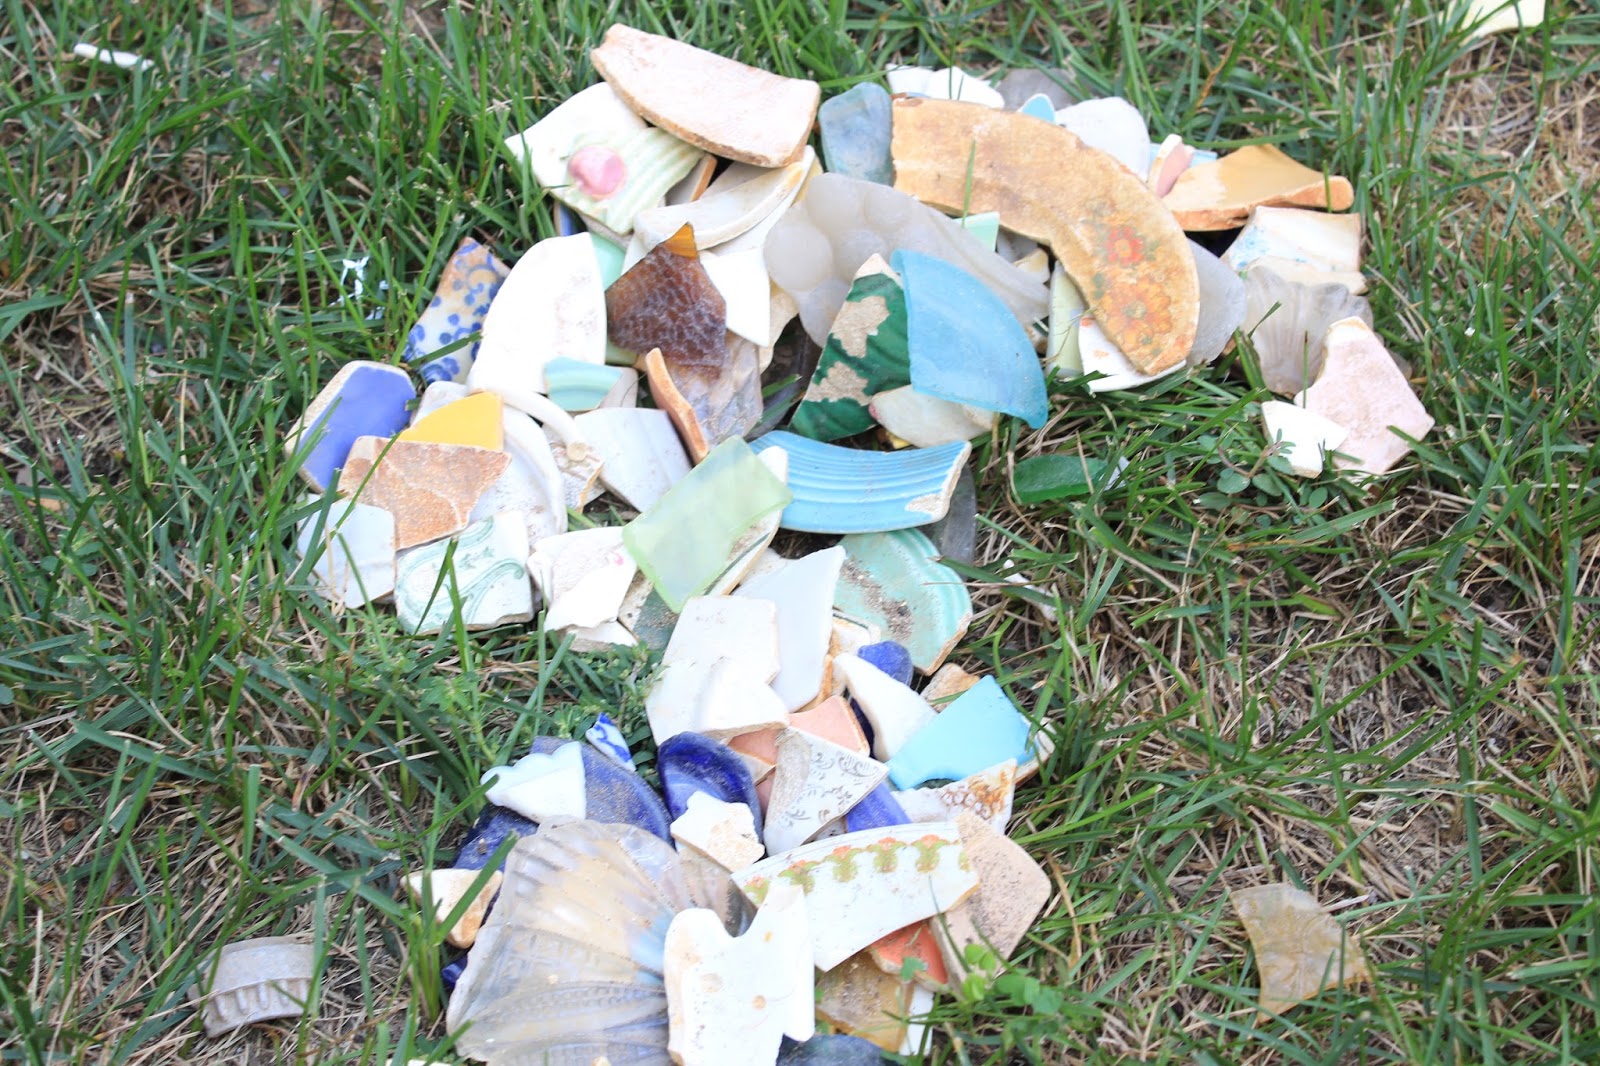
Pile of busted glass and plates that I found in my father in law's basement.
Not sure whose they were or were they came from but they were cool. |
And they were old.
When I started revamping this old girl, I wasn't sure what to do. Then I remembered the bag of busted plates that I saved from my father in law's estate sale! Didn't know what to do with them at the time but they were too cool to pass up and ended up on my 'some day' list of things.


A little spray paint from my paint shelf, glued on the glass, added some grout left over from our dining room floor project and she has a whole new life! All it cost was a tube of adhesive for 2.99!

Linking up this week to:

Tweak it Tuesday at Cozy Little House
Trash to Treasure Tuesday
Make it Pretty Monday at The Dedicated House   

Tuesday, July 2, 2013

Summer Garden Tour and a Bunch of Great New Ideas

Pin It 

Every year our community has an annual Garden Tour that is one of my highlights for the summer season. Gives me all kinds of great inspiration and motivation to keep gardening in my home.

Honestly? I have a 'some day' dream that my home will be part of it.


This 'shed' was so adorable. You should have seen the inside

Very unique divider made of old wine bottles and cds.

Love artwork hanging in the garden!

Loved this little shed as it looks so much like mine.


Very beautiful pond that took up the whole
side yard of this owners house.


One of the pathways down and through the pond to the bottom yard.
Loved the personalized chair!

Disguised pathway leading to meter.
 All photos taken with camera phone but hope you enjoy the 2013 Garden Tour!

Linking up this week to:

Treasure Hunt Thursday
Transformation Thursday
Blog Stalking Thursday
Show and Tell Friday          

Tuesday, June 11, 2013

Stuck in my craw

Pin It

Do you ever get something stuck in your craw?

I mean something that just won't go away? An idea that won't leave?


Thus the story of my firepit. You see there was a wee little fire pit when we moved into our home.


And I loved it. Really. I did.


But I wanted more. I wanted bigger and better. Now what's wrong with that?


My husband agreed with me after all. Who can ask for more.


Garage sale pot for .25 cents.


And bless him. He agreed with me so much that he and the boys started tearing up sod and sculpting out a great size firepit. I was so excited! I was.


Except that in less than four weeks I was hosting my first ever graduation open house!


Tin planter for .25 cents.

Busted brick in background? Priceless!

Now, some people say that timing is everything. I'm here to tell you.

So when they asked me to come and see what they had done. I kept calm. I didn't freak out. I didn't yell. I smiled and told them how sweet it was to do this for me. A gift for Mother's Day after all!


And three weeks later, one week before the open house, when the dirt was piled in mounds and the brick pavers were not put in and sod was everywhere. I did not panic.


Yup, you got it. I did just what the rock in my new firepit says..."pray continually".


Linking up this week to:


Trash 2 Treasure Tuesday at Kammy's Korner
Tuesdays Treasures at My Uncommon Slice of Suburbia 
Show Off Your Stuff at FIreflies and Jelly Beans
 Wow Us Wednesdays at Savvy Southern Style
Someday Crafts    

Monday, June 3, 2013

A Quicker and Easier Way to Stepping Stones

Pin It

This post came up in my memories feed from 2013 and as I was cleaning my yard up for Spring, I realized just how great these stepping stones still look six years later! So, yes I can still say:

"However, my best project yet? Stepping stones. Now you might be wondering why this is such a big deal? I have wanted to put a stepping stone pathway from the gate to the backyard and back towards the patio/pool area for eight years. Eight looooong years. You wouldn't think this would be such hard thing to do now would you? But it was either the money (means about 15-20 stones which can get quite pricey), needing a truck or trailer to haul them, needing help to lift the suckers, or just life that got in the way."


Recently I read some articles about quick and easy stepping stones and it got me thinking that I could make that project quicker and easier by cutting a few corners. You won't believe how easy this was!

1. Buy a bag of Quikrete or regular concrete (each bag makes about 3-4 stones)


2. Dig the sod out, sculpting the size and shape that you would like the stone to be. Depth is about 2".

3. Pat down and shape the dirt then stomp on it a little to pack it down tighter.

4. Mix the concrete to a thick milk shake like consistency and pour into the hole, smooth top with a trowel or hand shovel and let dry. Read more about mixing Quikrete.


Add enough water to make it a milk shake like consistency.
Remember, if it is too thin, let it set for a bit to thicken.
Too thick? Simply add more water.


So simple and so happy with how they turned out! If you wanted to get more creative you could add mosiac tiles or paint glitter or tint the concrete. The sky is the limit really!


Stepping my way to the backyard of my dreams!


Monday, May 13, 2013

Simple and easy way to keep your silk plants fresh.

Pin It

We all have it. That dried wreath, the faux greenery, the silk flowers. Yup, I betcha each and every one of you have some in your homes. Cause after all it looks amazing. Like, how can they make that stuff so real looking?


But a year later that silk plant looks dingy and the dried wreath is dusty. And you try to dust them with a cloth. Or you sick the blow dryer on them. You could probably even take them outside and shake them out. So what to do my friends? How do you keep them looking fresh and keep those dust bunnies away?

Same thing you do to your kids. Throw them in the shower! The shower will wash away the dust and brighten them up and make them look brand new again. Or, you can spray them off in the kitchen sink but either way, after you spray, let them drip dry for awhile. Shake them out a little bit and put them back out again. And if the colors run a little bit, no worries, it won't even hurt them!


Sunday, May 5, 2013

Ways to drive your husband nuts, part 1

Pin It

My husband is a good sport. Really, he is. Over our almost 24 years of marriage he has tackled some pretty unique projects. All because I have asked him. Now that's not bad, huh?

However I have noticed a trend that, as the years have gone by, he has been less and less enthusiastic about some of my projects. Yup probably most of them if the truth be told. So for many years, I would do my part of the project and when I got to the part I needed help with (usually installation of something) I would start it myself which would get the immediate -- and anticipated -- reaction of "here, let me do that." Score!
An old picture from from my father-in-laws house.
I can't resist a great picture frame!
Not sure how to use it yet but will figure it out!

Now don't judge him. He is very handy and almost always willing to install a new patio door or hardwood flooring. Those kinds of projects he is okay with and even wants to do. It's the "The Decorating Chica's" projects that he struggles with because these are, in the big scheme of things, pretty unnecessary. Well,to him anyway!  


With a little creativity and some paint!


So thus begins my newest project the 'picture framed turned ceiling light medallion' project. I mean, after all, you can't let a good picture frame go to waste now can you?

After a few minor mishaps, the successful installation of a picture frame hanging on the ceiling. Yup, maybe this time I have really lost it!
My picture frame turned ceiling medallion!

Partying this week at:
How I found my style Sundays  
10 Beautiful DIY Lamps and Linky Party
nifty thrifty things
Overflowing with Creativity @ It's Overflowing
Sundae Scoop Weekend Wrap Up Party @ I love Nap Time 
So Darn Crafty Party @ Sew Many Ways


Tuesday, April 30, 2013

Breakin' the Rules: My Chalk Paint Adventures

Pin It

Yup I finally did it. I bit the bullet and dove into the world of chalk paint. Now it's not that I haven't been reading about it for awhile but honestly, I didn't see much advantage over traditional furniture painting. Except for one thing. No prep. 


This is how the dresser looked when I got it.
Cost? Nothing. Well, it didn't cost money anyway!

Don't get me wrong I love to repurpose and repaint furniture but the prep work? Not so much. So, when I read about how easy chalk paint is and that there is little to no prep work. Well, that was it for me. I decided I had to try it.


Can't beat the price of this recipe!
You know what they say about the best laid plans? There was not a place to be found in the surrounding 2-3 cities that sold chalk paint. However one day I saw an ad on Craigs List for chalk paint and it was a couple of miles awhile. Can't beat that! I was so excited so off I went to check out this store. Made a total of five trips to this store and they NEVER had much selection of chalk paint on hand. Oh, yeah they could mix me up some if I wanted to come back another day. Or, they would get a new shipment in yet today, they were sure.


Cabinet post chalk paint and stencil.

So I went back to the internet and decided to mix my own. I chose the one of the Plaster of Paris recipes that I found. Loved applying it but after it is all said and done...can't say that I am sold. I think the work is about the same and it is definitely not as resistant as I would prefer. But for now, I love how it turned out which is a big change from the before.


For this week I'm linking up to:
A Stroll Thru Life/Inspire Me Tuesday
My Uncommon Slice of Suburbia/Tuesday's Treasures
Savvy Southern Style/WUW


Power of Paint Party at Domestically Speaking

Tuesday, April 23, 2013

Breakin' the Rules Painting: Choosing Paint Colors

Pin It

Let's face it, choosing paint colors can be super intimidating when it comes to redecorating a room. There are lots of instructions out there and rules to follow. Heck now the paint companies even put together coordinating color groups for you. Takes all the fun out of it!


This is my looong, dark upstairs hallway.
Notice the dark door trim and baseboards.
Definitely time for the dungeon to go away!


Well you know I am not a rebel but heck I never was one to like a lot of rules either. My motto? If I like how it looks and the 'feel' is right, then go with it. That goes for paint colors too. 

My original plan for my upstairs hallway was for the
grey to be on the walls and the lighter color
to be on the ceiling. Just did not feel right to me. Why?
Because the grey was looking very blue when it was on the walls.


The rules that I break? 
1. I don't buy a sample to try on the wall. Shoot I don't even think that really works. You can't get a real idea of how the color is going to look by painting a little of it on a board or on the wall and looking at it for several days.
2. Don't be afraid to change the color yourself. If you get a color that is not quite right whether because of your choice or because the paint store goofed, fix it yourself by adding more white or black or whatever.

So I switched it up and put the grey on the ceiling.
Can you believe that grey on the ceiling is the same color
as in the other picture?

3. Don't be afraid of dark colors. I don't believe that they make a room look smaller but it does however, change the feel of a room and make it cozier and more intimate.
4. If you have to, change your game plan. Oftentimes I have redecorated in my mind and know exactly what I plan to do in a room. But when the rubber meets the road, things oftentimes don't work out how I've planned. It pays to be flexible even with painting.


Nook area at top of stairs.
Moved sofa table from another room
and am still working on the photo collages.

In the end, trust your instincts and know that your room will look worse before it looks better. Crazy I know! Remember too that oftentimes it is more than the paint but it is the accessories that really tie everything together and make it cohesive.


Linking up this week to:
A Stroll Thru Life/Inspire Me Tuesday
My Uncommon Slice of Suburbia/Tuesday's Treasures
Savvy Southern Style/WUW

Monday, April 8, 2013

How do you decide?

Pin It

Yeah, you know, how do you decide what your next project is going to be? If you are anything like me, you have a list a mile long of projects on your 'to do' list. 


This picture is a perfect example of a 
misdirected project. Purchased at a consignment 
shop for the frame to use in another picture 
(see below). Somehow it ended up on my wall!

Actually I have many lists, some are in my head, some are on scraps of paper, and some are actually quite organized where I go room by room and list out the fixes or updates or just 'wishes' that I would like to do to that room. But sometimes my list gets too overwhelming and I have to put them away and sometimes my list keeps changing because of the awesome inspiration and ideas that I get online. It's exhausting I tell ya!


This print, designed in Photoshop by my
youngest son, is what I was originally shopping
 for. Trying to find the right frame for the print.

But the biggest factor in deciding my next project depends on a bunch of things really. Sometimes it is flat out influenced by lack of funds. Sometimes the funds aren't the problem but finding just the right items that I need to finish a project just aren't available. Many times I am limited by my lack of skill and waiting on my husband to have the time to complete some of the preliminary work. Sometimes my next project comes out of nowhere when I am cruising through a consignment shop, or at HomeGoods, or I am driving down the road and find a sweet curbside find. Often though, it is my time. I find that my time is the most valuable resource and the hardest to find. 

You see in this example of shopping gone awry, I had been wanting to find a big picture for the above wall to hide something ugly that can't be fixed. Well, yes, it could be fixed by tearing down my ceiling, hiring an electrician to hard wire a ceiling fan that currently finds it's source of power from an ugly chain running down the wall. 

So how do you decide what to do next?

Linking up this week to:

The Sunday Showcase Party
NIfty Thrifty Things 
Sundae Scoop Party 
IT's Party Time

Wednesday, April 3, 2013

Everything changes and nothing stays the same

Pin It

One thing is sure in this life...everything changes and nothing stays the same. That sure is true around our house. We have been up to our eyeballs in my father in laws estate clean out. The trickle down effect is that my house is looking pretty messy to say the least! Having a lot of trouble getting my projects completed, keeping things cleaned, laundry done, work. You know the drill.


These prints moved from the living room to
 their new home in the kitchen.


But there is definitely something about Spring that makes me want to switch things up, move things around, and change things out. Exactly what I've been doing my friends! Here is a glimpse into some of the quick little changes I've done recently.


Changed out the darker plates for some lighter, brighter plates.
Definitely lightens things up!
It is truly amazing how new everything feels just by switching things around and moving stuff from room to room. It's like getting a brand new house!


Cute little table found at HomeGoods for $39.99!

Reworked the top of this cabinet by pulling things out of storage bins.


In the dark.

Pulled these prints from a back hallway and the plaque from over the back door.
How often do you changes things at your house?

Linking up this week to:


Monday, March 25, 2013

Ye Olde Ugly Doors

Pin It

We have lived in a traditional style house, built in the mid-1970s, with a mediteranian style flair to it. Can we say U.G.L.Y.?

Lots of dark wood...talking all the baseboards, kitchen cupboards, interiors doors, paneling/wainscoting, and so much more. I have diligently worked for 8 years to rid the house of this dark wood and ugly, dingy brass fixtures. 

Thus the story of "Ye Olde Ugly Door" There are 14...yes, fourteen...interior doors that were original to this house that looked like this:

This is with the casing
painted white. Previously they were all
dark like the door. Ouch!
We have updated these doors in a variety of ways by painting and updating hardware to existing door, replacing the door with brand new, or simply removing the door (which is a temporary option at this point). As I've started updating the second floor hallway (that is a future post) my original intent/desire was to replace the doors. That amounts to 5 different doors which equals approximately $750-800 dollars. While replacing the doors may seem the best solution, beyond the cost, it has been somewhat problematic. We have replaced doors in a couple of different ways: by replacing only the door and fitting it into the original door frame and casing and we have replaced a door with the frame as a whole unit. Both have had their issues to get them to work. 


Replaced doors left in their 'natural' wood.
Tied together via door handle and trim paint.


The "easiest" solution has been to paint and replace hardware, however it is the most labor intensive.


Hallway closet door near kitchen.
Painted dark wood, replaced handled,
added framing from scrap wood and
chalk board paint. Trimmed with decorative
accent on top.
Linking up today with:


The Dedicated House Make it Pretty Monday
Mod Vintage Life Mod Mix Monday
Alderberry Hill Make the Scene Monday
Whimsical Perspective My Style