Saturday, January 28, 2023

DIY Firepit area

Pin It


I love my propane fire table that I use on the patio. But there is something about a log fire pit, am I right? This past fall my kids dug up an area in the side backyard for a new fire pit area. The labor was a belated birthday present and my DIL killed it! She is a worker and easily outworked my boys!

Digging up the sod.


Found this as we were digging. No idea what it
connects to, however we have  indications there
used to be a sprinkler system in the back yard.


Laying brick border.


This is the river pebble we used in between the limdstone.


Using limestone for old retainer
wall to form a rug look.


Finished, sans the grass seed and landscaping
that will
happen in the spring. Center area is for the fire pit.


Done! And just before Thanksgiving!


Anxious for spring to get back out and landscape the area, add the firepit, and the pergola.

Thanks for looking!

Linking up to:


Sunday, January 22, 2023

One Thing Leads to Another

Pin It

One thing we never thought of, when renovating our backyard, was replacing the limestone retainer wall that runs at the back of the patio. But little did we know that it would start imploding last summer! Honestly we probably did not help the situation by having several junipers removed that were quite old and planted in the top part of the wall. This was probably part of the reason as the root system was likely holding things together. Yeah, we saw signs of that happening but still...

I guess, looking back at old photos, it was in a lot
worse shape than we realized. But in it's own way
it had its charm with all the aged layered limestone.
All the hostas in this photo (and much more on other side)
was thrown in a pile that sat in the hot summer weather
for 6 weeks. After the new wall was finished, I replanted
 them and they all lived.


After removing the limestone.


limestone


Boy, did we have limestone!
Every bit of it was used in other parts of the yard. 


This is along the length of the north half.


Lining up the new retainer wall block after
a load of gravel was put down as a base.
That black 'pole' is actually the gas line to an original
gas grill. It didn't work and we had the gas line disconnected
but no way to tear it out.


Progress!


After many weeks of part time work, it was finally finished. Well the wall was finished anyone. Next was my turn in replanting all the hostas and new plants and landscaping the top. I love how it turned out and so happy that our old wall imploded after all!

This is a view along the top of the wall as it runs to the
north side of the patio. Replanted the hosta from previous
wall that was torn out, bought some new hostas and perennials.
Used limestone to edge the planted area.


This view is the patio side of he wall and how it
seamlessly rolls into the pond area as well
as the patio area.


Saturday, November 19, 2022

Back yard transformations

To say that our backyard has been transformed would be an understatement. The back part of our backyard was full of 70 years of car mats, broken vases, pottery, shutters, scraps of wood. You name it! But look at it now! Three years of hard work has paid off!


            So much work cutting out sucker trees and digging out trash.


Adding 'no dig' edging (love this stuff) and planting arborvitae bushes


Next summer project is the path that goes around the
'secret garden' area, have the supplies and a plan!


Definitely have more to do but super happy with what has already transpired.


Hope you enjoy a little bit of garden inspiration!


Tuesday, March 29, 2022

A #1951renovation

Pin It

Two and a half years ago we downsized from our 1970s traditional two story and moved into a single story ranch built in 1951. We have updated and updated and updated in those two years! But I am loving how it is turning out! This house is in a historic neighborhood called Merritt Woods and is a beautiful area with the best neighbors right in the heart of our city.

Check out some of these projects.


Main bathroom Refresh


Basement Half Bath


Master Bedroom


Bedroom turned office.


Coming soon: Dining Room/Kitchen, Basement Remodel, Family Room projects, and more.


Saturday, January 22, 2022

When your plan really isn't your plan after all.

I don't know about you but before I start a project, I start the vision for the project. Sometimes way before the project starts! But often, that vision changes multiple times before the project is finished. Heck sometimes I don't really even have a plan I just start painting or tearing out stuff and sometimes I just change my mind. But most times, it is because what I really want to do, for one reason or another, I can't. Take our basement bathroom for example. In this case I had a basic plan and everything that could go wrong, went wrong.

As I was thinking about the bathroom I realized I hated it in the furnace room to begin with. I also hated the sauna and shower the previous owners had installed at the other end of the basement (which we never use). So I put plans in motion to get rid of the sauna. This would free up a big chunk of space and my plan was to make it a full bath at that end of the basement as it already had a shower. Several months later, and multiple failed attempts to have sauna removed, I decided to tackle the 1/2 bath again. 


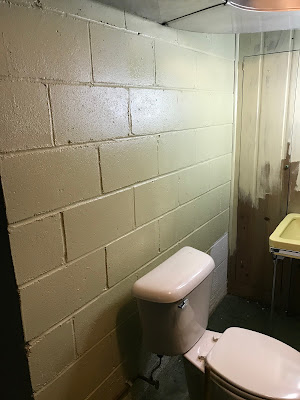
Original bathroom.


I was hoping to be able to move new sink to this wall to open up more space in the bathroom. But, was major issue so we decided against it.


Dark and dreary did not even begin to describe this room. So one day, with no particular plan in mind, I grabbed a gallon of paint and started painting. The whole time I was painting I didn't like it but kept going because I knew that everything was going to change and I might like it eventually.


First pass was painting. Didn't like color so repainted later but
used the first color on cinderblock as base coat for German Shmear.


After I finished painting the walls, I painted the shelves and put peel and stick wallpaper in the back. In both cases using leftover supplies. I loved the shelves but didn't like the beige color so painted it again using leftover Repose Grey paint. However was still debating over what to do with the cinder block wall and finally decided on a German shmear (which I had never tried before). I kept the beige color on the cinder block for the base and, used plaster spackling to create the shmear.


Painted shelves white and added wallpaper to line the back.


Added white to the beige as step 1


Second pass was a burgundy, using some leftover craft paint.


After adding black. 

Final look after adding 'shmear'


On the sink wall I used Palisades vinyl wall tile to cover that wall and somewhat to cover some of the wood panel since it is everywhere in this basement. 


Adding the vinyl wall tile.


Palisades vinyl wall tile is super easy to install. Measure, cut with utility knife, add Liquid Nails on the back and install.


Full view that captures the new sink, restyled shelves, 


After adding the groutless wall tile, I had my husband mount a mirror I purchased off of Marketplace. Then, since electrical has been crazy in this house, had an electrician install vanity light and hanging drum light.


$10 mirror from Facebook Marketplace.
Final cinder block after adding the texture for the shmear.


Purchased this drum light from Facebook Marketplace and I love it!
Reflects soft light all over the walls. 


I would love to have you follow me on Hometalk or Pinterest for more inspiring ideas!

Thank you for stopping by. 

Cyndi, the Decorating Chica


Tuesday, December 28, 2021

An office refresh

A year and a half ago, when we moved into our empty nester house, I decided to use the middle (aka smallest) bedroom for an office. Little did I know that four months later we were in lock down! 

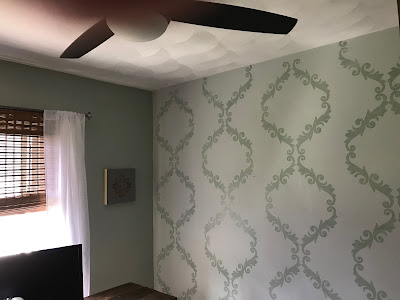
In the process, I painted the walls with some leftover paint, used a rug from our other house, set up my computer and was good to go. However, a few months later I was ready for a little personality! Easiest method was to make a focal wall. Since only one wall in the room was a solid wall, this was not a hard choice! I decided on a stencil as it was quick and cheap. Found a great stencil at Hobby Lobby and, since I wanted a subtle look, decided to use the darker shade of the room wall color and added some clear gloss to make it shiny.


Started stencil working left to right. 


Alternated every other row.

This is what I used to add the 'shine'


Finished!

Added a quick wall arrangement using the black shelf from before, two tin ceiling tiles I took from my work office, plus wreath and cool wood thing I found at a vintage store.

Thanks for visiting!

Linking up to:
Inspire Me Tuesday