Saturday, February 24, 2018

Picture Frames Oh My...


I have a confession. I love picture frames. Empty picture frames. I know, right?

I love to put frame within frame. I love to paint them. I love to put framed pictures within empty frames. It's real!

This project is the wall at the bottom of the basement stairs. Which makes it real hard to get a good picture! These frames were found a consignment shops, garage sales, and a neighbors trash. I'll just leave that right here.


Painted with grey leftover paint and antiqued with ochre wax.
I may add more, I may not. Who knows?

Thanks for stopping by!

Linking to:

Feathered Nest Friday at French Country Cottage

Tuesday, November 7, 2017

Can't Let Summer Go


Yup, it's November here in Michigan and the temps are going to drop into the single digits next week. My gardens are being put to bed for the winter and the leaves are all falling and being raked up and everything tucked away for another winter season. But, I just can't let go of summer. I am already longing for next summer, watching my gardens comes to life, opening the pool, and enjoying the long summer days.

So today, I'm taking one last look at summer and then it's time to say goodbye.


Love this cute potting shed!

Cute way to use an old box.

This house was gorgeous!

Beautiful shade garden

Great way to hang bird feeders and can stay up all year!

This house was my absolute favorite!

Add caption

Love ponds
 Well, the reminiscing is over and it's time to embrace the holidays and pull out Christmas decorations.

Happy Fall!

Linking up to:
Inspire Me Monday
Inspire Me Tuesday
Amaze Me Monday


Saturday, September 23, 2017

Which vanity do you prefer?

Like you, I have my favorite decorating shows that I regularly watch. For some reason, of late, I noticed that everybody wants double vanity sinks in the master bathroom. Like, they think they cannot possibly survive any longer without a two sink vanity!


This, I think, is a perfect solution. I mean the real reason most of us want a double sink vanity is for the space, right? This has one sink but plenty of storage and space.

Love the rustic look of this but, don't know about you, open shelves would NEVER work in our house.


We have a double sink, I confess. Not that I choose it. Well, yes I choose the cabinet/counter/sink unit but I did not choose it to be a double. It was already plumbed that way and it is a set in area that would have been problematic to only put one vanity sink in.

Check out our master bath by reading this post. Guess I need to update the post as it has changed quite a bit since then.


Seriously though, we have lived with a double vanity sink unit for 21 years in two different houses and, every week, as I clean the sinks I wonder why? I mean, we only use one sink. VERY rarely are we ever in the bathroom at the same time as someone else in the family. Really? Who wants to share a bathroom sink while plucking eyebrows and shaving? 

How about you? Do you have a two sink vanity? Do you regularly use both sinks?


Note: first two pictures are courtesy of posts from Pinterest. No knowledge of the original author.

Sunday, May 21, 2017

Raised Vegetable Planter and Poison Ivy

For several years I have been trying to find a good spot to plant vegetables. Unfortunately most of the sun that our property gets is where someone put the pool. So, other than a small area near the pool house, there is nowhere that really gets enough sun for a good vegetable garden.

The base (legs) are made with pine and the box is cedar.


The last two years I have planted this small area with tomatoes and peppers. The plants do great but they never grow many vegetables and they never get really big. 

Apparently the cedar will not rot from the moisture or dirt. We did not even stain it!

Last year, I saw this cool wood planter at one of the local home improvement stores and my husband bought the wood to build one for Mother's Day. Well life happened and the wood sat in the garage for that year. But this year? Yup, this year my husband spent the weekend of Mother's Day building my planter. It turned out great and I am so excited!

Tomatoes, green peppers, and beans oh my!
Oh but, yeah, I have poison ivy and it's only May. Sigh.

Linking up at:

Amaze Me Monday  
Feathered Nest Friday
Grace at Home 


Saturday, April 22, 2017

Lessons Learned from the Garden

Each spring, as I am trying to banish the ravages of winter from my landscaping and gardens. I am reminded how hearty the weeds are and how invasive. Whether the weather is cold, we are in a drought, or if it is hot and humid, weeds adapt and often thrive! More importantly, they keep on growing and pushing through to wreak havoc in my gardens.

Marshal Garden Tour 2016


As I work in my flower beds, pulling the weeds and tilling the soil, I am often hit with the analogy of the weeds. Weeds are much like the 'bad' in life. They take constant work to keep them from overtaking my garden and they easily thrive in the worst of times. It takes constant energy and effort to keep the weeds from taking control.

Marshall Garden Tour 2016


Like the weeds, it is easy to let the negative creep in. A constant battle with Satan to banish the negative and keep focused on the good. But just like the weeds, if we persevere in keeping the negative from creeping into our minds, soon we will see the world with a different perspective. In our gardens, if we persist in pulling the weeds to allow the beautiful plants to grow, soon our gardens will flourish and the beauty will outshine the ugly.


Side yard garden


Yes, it takes time. It takes care. But it is worth all the effort. The Bible says 'in all things be content.' I believe that the road to contentment is to persistently work at pushing the bad and negative out and allowing the gratitude and gratefulness to flow in.

Time to get back in the garden! Enjoy your weekend.

Linking up to:

Feathered Nest Friday

Grace at Home 246


Saturday, March 4, 2017

Should I Paint?

We have lived in this house since 2004 and 12 years I have been mulling over my brick fireplace. 

You see my house is a 70s built traditional 2-level house with the 'family' room in the back that has a brick fireplace that fills the. whole. wall. Seriously.

This is the fireplace in our back room. 
When we moved in the mantel was dark wood and the bookcases had dark brown paneling lining the back and the shelves and frame was all dark wood. Because the room has one patio door for natural light, this made for a VERY dark room. Additionally the wainscotting was also the same dark brown paneling. So in my efforts to lighten the fireplace and room I white washed the mantel and added the decorative element, painted the shelves white and actually added a gold metallic glaze over the top of the brick to make it shine and reflect light.

White washed mantel and painted shelves brighten the space.

I have been on the brink of an update but have hesitated every time. Why you might ask? Because once you paint brick there is no turning back (well unless you sand blast it!). So I wanted to be very sure that it was the right thing to do.

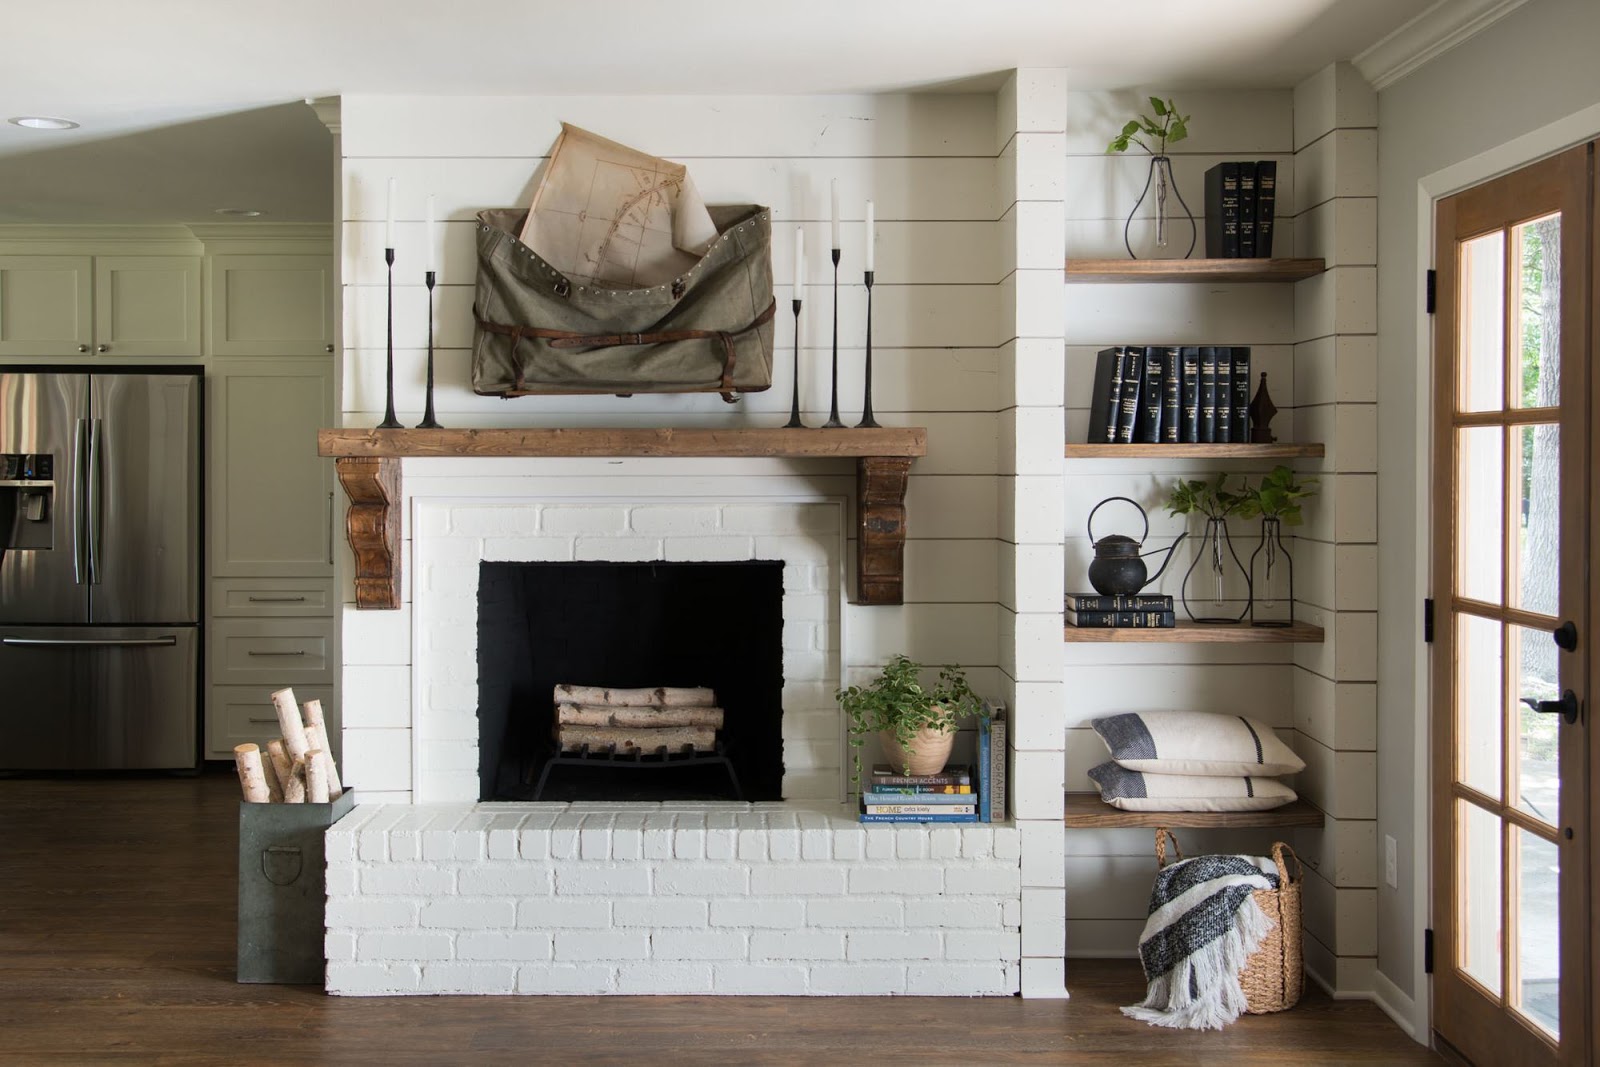
After seeing a Fixer Upper episode the last week of February of The Severn's I loved the shiplap and painted brick combo fireplace redo. Which has started me thinking it all over again and I realize it is time to take the plunge.


The Severn's home remodel and updated fireplace from Fixer Upper.


While this is my inspiration, the end result will be my own version of this. Besides, it is the first step in a whole room update which is long over due!

Stay tuned for the final results!

I would love to hear your thoughts. Have you ever painted and updated an old brick fireplace? Were you satisfied with the end result? Would you do it again?

Linking up to:


Friday, February 24, 2017

What you see is what you get

Happy Spring my friends! Oh wait, it's only February but it has been the best. February. ever. No kidding. But know this, if it snows again, I am going to curl up and cry!

Thought I would share a few of the sprinter collections that I have created. You know that awkward time after Christmas but not yet spring. Sprinter.

Vignette on the corner of the kitchen. Adds a small ray of ambient light on a cold, dreary day.

Did I mention I love old boxes? I do.

Love cute little tea sets. This winter one was purchased at Cracker Barrel. They have some great stuff!


Be still. Wise words!

Buffet in eating area.


Have a great day!

Hooking up with:

Friday Favorites at Remodaholic


Sunday, January 22, 2017

When Three Trips to the Paint Store Isn't Enough

Can't believe it is almost the end of January. Our boys are back at college and I am feeling bittersweet, sad, and mostly thankful. Thankful to have time with my guys home, grateful to have 10 days off of work over the holiday break, and mostly grateful for all that God has blessed me with.

However, with all that I have been feeling a bit lost and at lose ends. Usually I have a project(s) and can't wait for January where I can start my indoor projects. Although I do have a project, but with all of our college expenses, I can't afford to do what I would like. That project is a kitchen gut job but alas, it is not to be at this time. But what better way to spruce up a tired kitchen than a fresh coat of paint.


So off I go to the paint store, a.k.a. Ace Hardware. I knew I wanted a darker grey but other than that...wasn't sure. So I got some paint chips and looked at them awhile but by the time NY Day hit I knew my window of opportunity to paint had arrived. My first choice was a color called Cobblestone Street, but nope, it wasn't the right one. It looked lavender when I put samples up!! Off to the store I got go again to choose color #2.


Loved the color but didn't like it in my kitchen. There wasn't enough contrast and it didn't flow with the grey in my living room. My problem now? The next color down on the paint chip was Black Heron. That was too dark! Although I have always wanted a black room.


So I went back yet again to Ace Hardware! By this time, the staff was getting a little leery of me. This time, I wanted a custom color and that about threw them into heart failure! Luckily I was able to work with this great guy who took the Portland Twilight gallon that I had purchased and added more black and more brown and transformed it into the. perfect. color.

However I was sworn to secrecy as they are not supposed to do that. Shhhh. I am so happy to have finally found the right color. I think I need to find a name for it! Worse? I can't even show you a paint chip.

Pictures of the kitchen transformation coming soon.


Saturday, September 17, 2016

What to do with leftover barn wood

Pin It

After we solved the problem if making a faux beam, we had different size chunks of barn wood left from the project. Certainly could not throw them away but honestly wasn't sure what to do with the wood.

Over the next few months I started mulling it over and used the wood to make these:

I purchased the hooks several years ago at a flea market but had taken them down when refinishing the stairwell to the basement. Totally forgot about them!

Cleaned the wood, waxed it, and then added the hooks. 


These metal letters were purchased from Michael's over a year ago because I loved them but didn't know what to do with them. 


Cut different lengths from a the leftover plank of barn wood, waxed them with a ochre tinted wax, glued them together then supported with a 1x2 piece of wood to brace it in back.
The barn wood was such a rich shade of brown that it was not necessary to stain or paint. I simply waxed with a tinted wax to deepen and make it richer, let it dry, and then assembled.

Linking up today at:
DIY Salvaged Junk Projects at Funky Junk Interiors

Pretty Pintastic Pin Party

Home Matters Link Party

Grace at Home

Feathered Nest Friday


Monday, June 27, 2016

Knee Deep in the Weeds

Pin It

Happy summer! It's sure been awhile since I've peeked my head around here but it has been crazy busy in my part of the world. I hope you are all doing well. In my area of Michigan we are in a serious drought and I am spending all. my. time. watering and watering and watering. Yet after awhile it is barely helping my plants survive.

Usually I go out once a week and weed and dead head in my flower beds. The past two weeks I have had so many thoughts about the enemy and the daily battle that we as Christians face. Even in the drought where all of the neighbors grass is brown the weeds still grow. The good plants? They take lots of tender loving care, especially in this brutal environment. Lots of water and still they are struggling but the weeds are thriving.

This is my view across the street from my house and all around our area. Dry and parched.
Really, it is a good lesson about life. The Bible says that the enemy has come to 'steal, kill and destroy' and that lesson is truly evident in the battle of the weeds. All the time it takes to care for the good flowers yet the weeds just keep on peeking their ugly selves into my beautiful landscaping. I pull and pull. I rake and rake. It reminds me that leading living a life for Christ takes careful time and effort to remain focused on 'that which is good.'


Joining in this week to:
Inspire Me Tuesday
Inspire Me Monday
Amaze Me Monday

Saturday, April 9, 2016

Quick and Easy Fried Apples

Pin It

I don't know about you but I would rather be decorating than cooking any day. In fact, I probably would rather be doing most anything other than cooking. However I do like to fix a good meal for my family and they certainly enjoy it which, honestly, makes cooking somewhat rewarding. Plus it is the one time that we all sit down together during the day and connect. That. is. priceless.


You can add additional items like dried cranberries and walnuts.


Fried apples is one of those dishes and the recipe is super flexible. You can even use apples that are getting a bit over rip and therefore a tad on the mushy side because you are frying them so they will be soft anyway!

Fried Apples


  • Peel and quarter apples (quantity is dependent on how much you want and how many people you are serving).
  • Melt butter in a frying pan (I usually use 1/4-1/2 a stick and about 8-10 apples). The butter needs to be just enough to coat the pan. Once the apples start frying the juice of the apple will keep them from burning.
  • Add ins. Add a little bit of brown sugar (less than a 1/4 cup. Again this would depend on the amount of apples, the type of apples, and how sweet you like them) and cinnamon.
  • Additional add ins can be dried cranberries, pecans or walnuts.
Cook on medium low heat until soft. Serve warm.

Linking up this week to:


Thursday, March 3, 2016

New, old art project...at last!

Pin It

Wow, does it ever take you two years to finish a project? Well, that's how long this took. My brother in law gave me this cool tongue and grove wood that he was throwing out. I could not let that happen for sure.

The whole piece and where it hangs.


So I took it and figured I would do something with it but wasn't sure what. A few months later I fit the 5 pieces together and decided it would make a great coffee table with metal legs for that industrial look we were going for in our basement remodel.

All I did with the tongue and groove was scrub it (was filthy dirty), let it dry, then added ochre tinted wax.

Two years later, it ended up as artwork and two shelves for my sons creative space. Long story why and how it ended that way but I think it turned out pretty good.

A close up of the fleur d lei. That was a mdf piece I purchased at Hobby Lobby and then I painted a silver metallic and added silver leaf to parts to make it look aged.
Took me a total of 30-40 minutes to do this. Well, 40 minutes and two years! The ruler art was a piece I created a few years back, you can read about that here, and decided to layer it on top of the tongue and grove. Totally love the look! Is it a perfect piece of art? Nope. But it is rustic and looks perfect hanging on the wall!

Feathered Nest Friday

Grace at Home